
18 Days
Quick Facts
Ground transportation in Nepal
Hotels & tea-house accommodation
All meals except in Kathmandu
Guided tour & trek throughout the trip
Autumn, Spring
Moderate
Nepal
6,654


Why Mera Peak Climbing?
- The highest trekking peak (6,476 m) of Nepal
- Beautiful views of five of the world’s 8,000 m peaks: Mount Everest (8,848.86 m), Lhotse (8,516 m), Makalu (8,485 m), Cho Oyu (8,188 m), and Kangchenjunga (8,586 m)
- Carefully designed route to allow proper adaptation to altitude
- Explore the Hongu and Hinku Valleys
- Trek through remote Sherpa villages such as Paiya, Pangkongma, Ningsow, and Kothe
- Perfect peak to learn essential skills like using crampons, ice axes, and ropes for mountaineering
- Witness the sunrise and sunset view over the Himalayas
- Trek through Makalu Barun National Park
Trip Overview
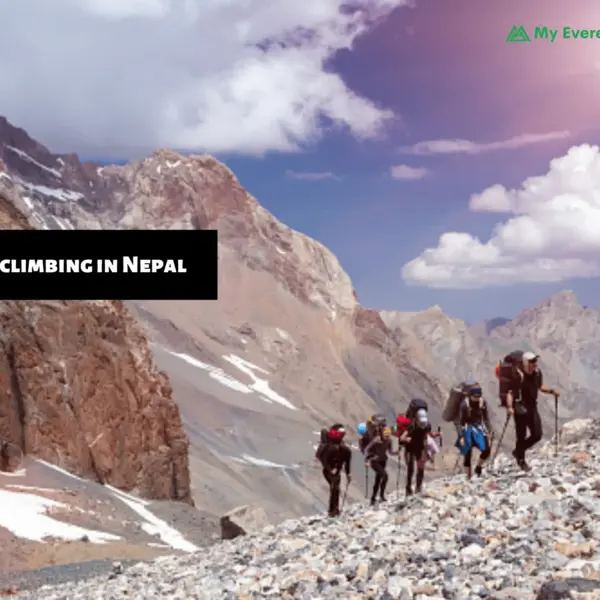
If you think a mountain is just a hill with altitude, try Ultimate 6,476m Himalayan Mera Peak Climbing. This trek takes you to the top of the highest trekking peak in Nepal. Mera Peak has three summits: Mera North (6,476 m), Mera Central (6,461 m), and Mera South (6,065 m). It was first successfully summited by J.O.M. Roberts and Sen Tenzing in 1953. The climb tests your endurance, strength, and mental focus.
During this journey, you’ll experience Sherpa culture very closely. You may see them in their traditional clothing, adorned with jewelry and headwear. You can also enjoy their cuisine, such as Thukpa (noodle soup) and momo (dumplings), which are commonly served in teahouses and lodges. You’ll see Buddhist monasteries, prayer wheels, and the way of life of high-altitude communities.
Wildlife is all around you in the Makalu-Barun Conservation Area. It is home to rare species like the Himalayan Thar, musk deer, and red pandas. Birds like Danphe and snowcock are common. The region features rhododendron, alpine shrubs, and various plant species, including sal and birch. Mera Peak requires basic mountaineering skills. You’ll use crampons, ropes, and ice axes for glacier sections.
This is your challenge. Step on the trail, face the mountains, and push your limits. You’ll reach Mera Peak and stand where few have stood.
Mera Peak Climbing Cost
The cost of the Peak Climbing Expedition ranges from USD 1,800 to 4,000 per person. This fee covers all major aspects of the expedition, including airport transfers, domestic flights, accommodation in Kathmandu and on the trek, meals, guide and support staff services, trekking and climbing permits, and related fees. It also includes high-altitude equipment support, rope and climbing gear, and contingency safety measures.
Mera Peak Climbing Itinerary
Day 01: Arrival in Kathmandu (KTM)
Your Mera Peak climbing adventure begins in Kathmandu once you arrive at Tribhuvan International Airport. If you don’t have a tourist visa, then you can obtain it at TIA. To obtain it, you need to fill out an arrival card and an online visa application form (available at kiosks at the airport), make a payment at the bank counter in USD, and then proceed to the immigration desk with your passport, visa form, and payment receipt. You’ll need a passport-sized photo, but one can be obtained at the airport for a fee if you don’t have one.
Once the visa is received, an airport representative from our agency will meet you at the arrival gate. He’ll display a signboard with your name and the company name, and then drive you to your hotel in a private vehicle. After checking into your hotel, you can relax and recover from your flight.
Dinner
Hotel
1,299 m / 4,262 ft
Day 02: Sightseeing in Kathmandu
On day two, you’ll explore the Kathmandu Valley before starting your trek to Mera Peak. You’ll visit four UNESCO World Heritage Sites with our guides. You’ll start your day early with a visit to Swayambhunath (also known as Monkey Temple), which is one of the oldest religious sites of Nepal. You’ll climb 365 steps to the main stupa for a panoramic view of the entire Kathmandu Valley.
In the afternoon, you’ll visit Pashupatinath Temple. It is the most sacred Hindu temple in Nepal dedicated to Lord Shiva. You can observe the cremation rituals from the opposite bank of the Bagmati River. Note that non-Hindus are not allowed inside the main temple.
From Pashupatinath, we’ll head towards Kathmandu Durbar Square. You’ll see ancient palaces, stone temples, and living traditions of the Newar community. The day also includes a visit to Boudhanath Stupa. It is one of the largest spherical stupas in the world and a vital center of Tibetan Buddhism in Nepal. You can join the pilgrims and monks in performing kora, the ritual of walking clockwise around the white dome.
After a short tour of Kathmandu Valley, you’ll return to your hotel and prepare for the next day’s flight to Lukla.
Breakfast, Lunch, Dinner
Hotel
5-10 km
1,300 m / 4,265 ft
8-9 hours
Day 03: Flight from Kathmandu to Lukla, trek to Chutanga
Today, your Mera Peak climbing expedition truly begins. To avoid afternoon turbulence and potential weather cancellations, flights to Lukla depart early in the morning, so you have to depart from your hotel at around 5:00 AM. The flight takes around 35 minutes to reach Tenzing Hillary Airport in Lukla. From the plane, you’ll see the Himalayan ranges, like Mahalangur and Khumbu, as well as Dudh Koshi Valley and River. Upon arrival, you’ll be met by the rest of your trekking crew.
From Lukla, you’ll begin your first trek towards Chutanga. It is a relatively short and easy trek that takes you east from Lukla. A 3–4 hour trek takes you to Chutanga, where you will spend your first night in a mountain teahouse. You can rest, eat, and prepare for the more challenging trekking days ahead.
Note: During peak seasons like Spring and Autumn, direct flights to Lukla are not available, so you may have to drive from Kathmandu to Manthali (Ramechhap) and then fly to Lukla.
Breakfast, Lunch, Dinner
Teahouse
138 km (KTM to Lukla by air 127 km + trekking 11 km to Chutanga)
3,100 m / 10,171 ft
35 minutes (flight) | 4-5 hours (trekking)
Day 04: Chutanga to Thuli Kharka via Zatrwa La Pass
The trek to Thuli Kharka is one of the most challenging sections of your climbing journey. The trail begins with an ascent through magnolia, rhododendron, and pine forest before reaching Zatrwa La Pass. As you climb higher, you’ll see Kongde Ri (6,187 m), Karyolung (6,511 m), Numbur Himal, and Lumding Himal. The pass often remains covered in snow that marks the transition from the Khumbu to the Hinku Valley region.
After enjoying the views from the pass, you’ll begin your descent towards Thuli Kharka. Kharka is a small, remote settlement used by yak herders during the summer season. You’ll pass through pastures where yaks may be grazing. After approximately 1 to 2 hrs of downhill trekking, you’ll arrive at the pastoral lands of Thuli Kharka, where you’ll find teahouses for your overnight stay.
Breakfast, Lunch, Dinner
Teahouse
10-11 km
4,300 m / 14,108 ft
6-7 hours
Day 05: Thuli Kharka to Kothe
Your trek today starts with the descent from Thuli Kharka. As you begin your walk, you’ll see Peak 43 (6,769 m) and the south face of Mera Peak. Its summit becomes more prominent as you move along the Hinku Valley. Moving deeper, the trail enters dense forests of rhododendron, pine, and moss-covered trees. Small streams and waterfalls appear along the way, all feeding into the Hinku River.
You’ll follow the Hinku River downstream by crossing wooden bridges and yak pastures. The air becomes warmer as you lose altitude, and the forest grows thicker. After several hours, you’ll reach Kothe, a small settlement on the western bank of the Hinku River. Kothe serves as a key stop for trekkers heading towards Mera Peak, with a few teahouses and resting spots surrounded by forest and river.
Breakfast, Lunch, Dinner
Teahouse
10-13 km
3,600 m / 11,811 ft
5-6 hours
Day 06: Kothe to Thangnak
Today is the uphill walk along the Hinku River Valley. The trail follows the eastern bank of the river and passes small stone huts used by herders. As you climb higher, you can see Mera Peak and Kusum Kanguru (6,367 m) in the distance. You’ll pass Gondishung, a common lunch stop, and the 200-year-old Lungsumgba Monastery.
In this monastery, there is a rock inscription that shows the route to Mera Peak. This ancient carving provides a glimpse into how earlier climbers and locals navigated these mountains, long before modern maps and equipment. Locals even believe that lighting a lamp here brings success for the climb.
The trail then continues through a rocky path before reaching Thangnak, a seasonal grazing area surrounded by the Dig Glacier (Dig Tsho) and Charpate Himal. This trek prepares you well for higher elevations ahead.
Breakfast, Lunch, Dinner
Teahouse
7-8 km
4,350 m / 14,272 ft
4-5 hours
Day 07: Rest and Acclimatization Day at Thangnak
Today you’ll spend a full day at Thangnak to rest and help your body adjust to the higher altitude. Acclimatization is an essential part of the Mera Peak expedition. The air is thinner, and taking a break here helps your body produce more red blood cells for oxygen. You’ll stay active with a short hike instead of complete rest to support better adaptation.
A popular acclimatization hike leads you to Sabal Tsho Lake (4,900 m), a frozen glacial lake. The hike offers spectacular views of the lake itself and the surrounding mountains, including Mera Peak, Kusum Kanguru, and Charpate Himal. You can also hike to Charpate Himal glacier, which lies above Thangnak.
After returning from your hike, you can spend the afternoon relaxing in Thangnak. Take it easy, stay hydrated, and enjoy the mountain scenery. Use the downtime to organize and check your gear. This is a good opportunity to make sure all your equipment is in order and that you are mentally and physically prepared for the higher climb ahead toward Khare.
Breakfast, Lunch, Dinner
Teahouse
0 km
4,350 m / 14,272 ft
0 hours
Day 08: Thangnak to Khare
You’ll trek from Thangnak to the high-altitude settlement of Khare, which will serve as your base for climbing Mera Peak. The trek begins by crossing the moraine of the Dig Glacier. From this point, you will see Charpate Himal, Hinku Nup, and Shar Glacier. The trail climbs gradually before a final ascent to Khare. The path becomes more rocky and rugged as you gain altitude, the air becomes thinner, and your pace will naturally slow down.
After a while, you’ll reach Khare. Khare is the last settlement with lodges or teahouses before the base camp and high camp of Mera Peak. It is the final opportunity for a warm bed and cooked meals before the more challenging part of the climb begins.
Breakfast, Lunch, Dinner
Teahouse
7-8 km
5,045 m / 16,552 ft
4-5 hours
Day 09: Trek from Khare to Mera Base Camp
On this day, you’ll enter the core climbing zone of Mera Peak Climbing. The day begins with an ascent onto the Mera Glacier. You’ll need to navigate across crevasses and potentially icy trails. Your Sherpa climbing guides will rope you together for safety during this section. Along the way, you’ll see Mera La Pass and a small yak herding spot. After navigating the glacial terrain, you’ll arrive at Mera Base Camp.
Upon arrival, you’ll need to rest, rehydrate, and eat a nourishing meal to prepare for your early morning push to High Camp. Your team member will set up the tent and prepare the meal for you. You can enjoy the meal by watching some of the highest mountains in the world, such as Mount Everest, Lhotse, Makalu, and Baruntse.
Breakfast, Lunch, Dinner
Tent
5 km
5,350 m / 17,552 ft
3-4 hours
Day 10: Mera Base Camp to High Camp via Mera La Pass
After breakfast, you’ll pack up your gear and start the climb. As you approach the pass, you’ll need to navigate snowfields and icy patches using crampons and trekking poles for support. From Mera La Pass (5,425 m), you can see Mera Peak and Kusum Kanguru.
After crossing the pass, the trail descends towards High Camp. The route passes small ice streams and alpine rocks, with prayer flags marking the way. Your climbing guide will likely rope you together for safety, as there are crevasses in this area. Upon arrival, your climbing team will set up your tents. You’ll need to rest, rehydrate, and have an early dinner to prepare for your summit push.
Breakfast, Lunch, Dinner
Tent
4-5 km
5,780 m / 18,963 ft
3-4 hours
Day 11: Summit Day: High Camp to Mera Summit and return to Khare
This is the main day, the trek is all about. You’ll wake up around 2 a.m. to prepare for the climb. After a light breakfast and last-minute checks of your gear, you will begin your ascent in the dark, using headlamps. The initial part of the climb is an ascent on the snowfields of the glacier. The cold, thin air and low oxygen levels will make the going slow but steady.
Your guide will use fixed ropes for the final, steeper section just below the summit. You will use jumars (ascenders) and other climbing equipment to assist with this final push. After 5 to 6 hrs of climbing, you’ll stand on the summit of Mera Peak. The summit offers a full view of five 8,000 m peaks: Everest (8,848 m), Lhotse (8,516 m), Makalu (8,463 m), Cho Oyu (8,188 m), and Kanchenjunga (8,586 m).
After reaching the summit, you’ll carefully descend the same route back to High Camp, take a short rest, and continue down to Khare. Reaching Khare marks the successful completion of the Mera Peak climb.
Breakfast, Lunch, Dinner
Teahouse
10-12 km
5,045 m / 16,552 ft
9-10 hours
Day 12: Khare to Kothe
After your physically demanding summit day, Day 12 involves a long descent from Khare back to Kothe. You’ll start your day with a final breakfast at your teahouse in Khare before beginning the long descent. The trail will take you back past Thangnak. It offers a different perspective of the landscape as you move in the opposite direction.
After the long day of trekking, you’ll arrive back in Kothe, where you can relax and celebrate your successful summit of Mera Peak. The teahouses in Kothe offer more comfort and warmth than those at higher altitudes. A good meal and well-deserved sleep at night will help your body recover from the strains of the summit push and the long descent.
Breakfast, Lunch, Dinner
Teahouse
15-16 km
3,600 m / 11,811 ft
6-7 hours
Day 13: Kothe to Thuli Kharka
Following a hard day descending from the summit and reaching Khare, Day 13 continues your descent back to Thuli Kharka. The route from Kothe to Thuli Kharka is a mix of uphill and downhill sections. You’ll trek through forests of rhododendron and pine by enjoying the beauty of Hinku Valley.
As you approach Thuli Kharka, you’ll reach the pasturelands where you first stayed on the way up. Arriving back at Thuli Kharka, you’ll have one last opportunity to catch a final glimpse of Mera Peak.
Breakfast, Lunch, Dinner
Teahouse
12-13 km
4,300 m / 14,108 ft
5-6 hours
Day 14: Thuli Kharka to Lukla via Zatrwa La Pass
After leaving Thuli Kharka, the trail ascends for about 2 to 3 hrs to reach the Zatrwa La Pass. This is the final high pass of the Mera Peak trip. From the top of Zatrwa La, you can see Lukla Valley and mountains like Cho Oyu, Numbur Himal, Kongde Peak, and Kusum Khangru for the last time.
The majority of the day is a downhill trek. From the pass, the trail descends to Chutang before making its way to Lukla. Upon arrival in Lukla, you will have completed the trekking portion of your Mera Peak expedition. It is time for celebration with your tea, enjoying a good meal, and a hot shower.
Breakfast, Lunch, Dinner
Teahouse
18-20 km
2,860 m / 9,383 ft
8-9 hours
Day 15: Extra Day for Contingency
This day is kept as a contingency or buffer day to ensure flexibility in your Mera Peak expedition. The most common use of this day is to account for unfavorable weather conditions, which can delay a summit attempt or flight to Kathmandu. If a member of the group experiences altitude sickness, a contingency day provides extra time for rest and recovery without disrupting the entire schedule.
If the contingency day is needed, your expedition guide will make an informed decision on how to use it. This might mean rescheduling the flight day, waiting for the weather to clear, and extending the rest day. If everything goes as planned, you can use this day to rest and explore Lukla. You may walk around the nearby Sherpa villages, visit small monasteries, or just relax at a teahouse.
Breakfast, Lunch, Dinner
Teahouse
0 km
2,860 m / 9,383 ft
0-2 hours (if needed)
Day 16: Flight from Lukla to Kathmandu
Today you’ll leave the Everest region. The flight from Tenzing-Hillary Airport in Lukla is heavily dependent on weather conditions and visibility. To avoid delays caused by afternoon winds or cloud cover, flights normally operate in the early morning. Your team will likely wake up early to prepare for the trip.
This short 35-min flight offers one last aerial view of the Khumbu region, with glimpses of Everest, Ama Dablam, and the Mahalangur Himalayas. Once you land at TIA, you’ll be transferred to your hotel in Kathmandu. The rest of the day is yours to relax, enjoy a warm shower, or explore the streets of Kathmandu.
Breakfast, Lunch, Dinner
Hotel
138 km ( 127 km Lukla to KTM by air + 5–10 km local transfer)
1,400 m / 4,593 ft
35 minutes (flight)
Day 17: Rest Day in Kathmandu
Following your flight back from Lukla, this is a designated rest day in Kathmandu to relax and reflect on your adventure. After a week of high-altitude trekking, your body will appreciate a slower pace. Use the day to rest your legs and enjoy national and international dishes, as you can find a variety of restaurants and cafes here.
You’ll also have time to stroll around the streets of Kathmandu. If your hotel is around the Thamel area, then you can do some souvenir shopping for prayer flags, paintings, or handmade crafts.
Breakfast, Lunch, Dinner
Teahouse
0 km
1,400 m / 4,593 ft
0 hours
Day 18: Departure
On the final day of your Mera Peak expedition, your time in Kathmandu will be dedicated to your departure. After breakfast, you’ll pack your bags and prepare for your flight home. Confirm that your passport, flight tickets, and other travel documents are in order and easily accessible.
We will arrange your airport transfer by providing a vehicle and a driver to take you to the airport. The drive to the airport can take anywhere from 30 to 60 minutes, depending on traffic conditions in Kathmandu.
It’s not just a goodbye to Nepal, it’s a promise that you’ll return for another adventure.
Breakfast
Hotel
0 km
1,400 m / 4,593 ft
0 hours
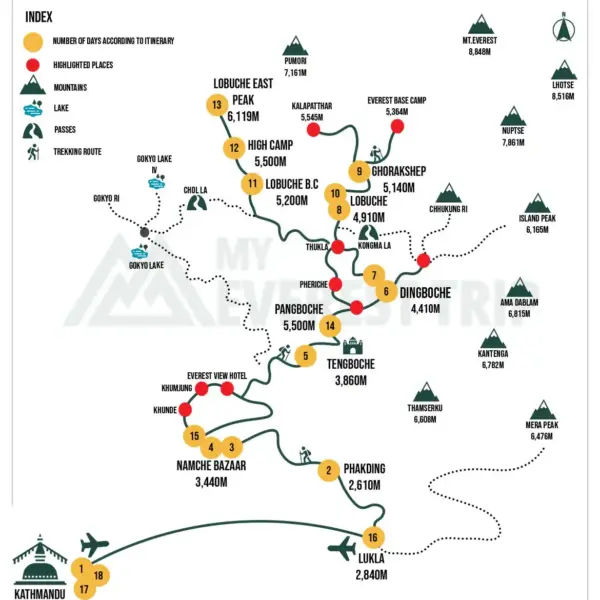
Mera Peak Climbing Map
What To Expect?
What's Included
- Airport/hotel pick-up and drop-off by private car.
- At least two nights at a 3-star hotel in Kathmandu, bed and Breakfast plan
- Meals on the entire board (breakfast, lunch, and dinner) during the whole trekking
- Domestic flights (KTM-Lukla-KTM) with all surcharges and airport taxes for guests and guide
- Trekking map
- An experienced government-licensed holder guides
- Trekking porter/Sherpa who will carry your bags during the trekking
- Insurance, salary, equipment, transportation, local tax for guide and porter
- Group medical supplies (a first aid kit will be available)
- All necessary paperwork and national park entry permits
- Travel and rescue arrangement
- TIMS (Trekkers’ Information Management System)
- All government taxes and tourist service charges
What's Excluded
- Meals in Kathmandu before and after trekking
- Your travel insurance ( Rescue )
- Nepal entry visa fee.
- Tips for trekking staff and drivers
- Drinks (hot, cold, and alcoholic)
- Personal shopping and laundry, etc
- Personal trekking equipment
Tripadvisor Reviews
Google Reviews
Mera Peak Climbing Additional Information
Why is Mera Peak Climbing a must-do in 2025/2026?
Mera Peak Climbing in Nepal is one of the best high-altitude experiences you can have. The peak is reachable for anyone with basic mountaineering skills. It is safe, budget-friendly, and a perfect peak to climb in the 2025/2026 trekking season.
Highest Trekking Peak in Nepal at 6,476 m
Mera Peak is renowned as the highest trekking peak in Nepal, with its northern summit reaching an elevation of 6,476 m. Unlike technical Himalayan climbs, the standard route is managed for trekkers with basic climbing skills. You’ll use crampons, ropes, and ice axes on glacial sections, but no advanced technical items are required. Climbing Mera Peak gives you an opportunity to step above 6,000 m and witness nearby peaks like Mount Everest, Lhotse, Makalu, Cho Oyu, Kusum Kanguru, and Kanchenjunga.
Crossing the Zatrwa La Pass (4,610 m)
During your Mera Peak Climbing expedition, you’ll cross Zatrwa La Pass, which sits at 4,610 m above sea level. The pass marks the transition between the Khumbu region and the Hinku Valley. From the pass, you can see Kongde Ri, Karyolung, and Numbur Himal. Crossing Zatrwa La is an important acclimatization point. It helps your body adjust before moving to higher camps like Thuli Kharka and Khare. The pass can take 3-4 hrs to cross, depending on the weather and your pace.
Affordable climb for a 6,000 m Peak
Mera Peak is one of the most affordable and accessible 6,000 m peaks in Nepal, with costs ranging from USD 1,995 to 3,000 per person. You’ll also have access to climbing gear like ropes, crampons, and ice axes where needed, without extra hidden costs. For a peak at 6,476 m, the cost is lower than many other Himalayan expeditions, like Island Peak Climbing and Lobuche Peak Climbing. You’ll get a complete climbing experience, from the base to the summit, while keeping your budget manageable.
Adventure Through Remote Hinku Valley
During the Mera Peak trek, you’ll walk through the Hinku Valley, one of the most remote and untouched Himalayan regions of Nepal. The valley lies between the Lukla and Makalu Barun National Park areas and stretches along the Hinku River, which flows from the glaciers of Mera Peak. You’ll pass small settlements like Kothe, Thangnak, and Khare, where Sherpa and Rai families live a traditional mountain life. You’ll walk on less crowded paths, far from the busy trekking routes of the Khumbu region.
Trek Through Makalu Barun National Park
During the Mera Peak adventure, you’ll trek through Makalu Barun National Park and its surrounding buffer zone, one of the most biologically rich protected areas. The park covers 1,500 sq km and ranges in altitude from 435 m to over 8,000 m. The park is home to more than 3,000 plant species and over 400 bird species. Trekking here connects you directly with the remote landscapes of Nepal, where clean rivers, glaciers, and mountain ridges meet Himalayan ecosystems.
Mera Peak History
Right next to Mount Everest is the highest trekking peak in Nepal, i.e., Mera Peak. At 6,476 meters above sea level, Mera Peak is the highest you can go without mountain climbing permits. In the Mahalangur section and Barun sub-section of the Himalayas, Mera Peak offers a formidable yet achievable climb for those with the right experience and preparation level.
The climb to Mera Peak is suitable for both experienced and new trekkers, but it requires good physical fitness and prior trekking experience. The region’s history is rich. British expeditions extensively explored the area in the early 1950s, before and after the ascent of Mount Everest. Notable climbers, including Edmund Hillary, Tenzing Norgay, Eric Shipton, and George Lowe, were part of these expeditions.
The first successful ascent of Mera Peak was completed in 1973 by a French team led by Col. However, Peak Mera was only climbed on 29 October 1973 by L. Limarques, Ang Lhakpa, and two other Sherpas. Since then, Mera Peak has gained popularity among climbers, particularly after Edmund Hillary and Tenzing Norgay used it as a practice peak before their historic ascent of Everest.
Mera Peak Altitude/ Elevation
Mera Peak stands at 6,376 meters, making it one of the highest trekking peaks in Nepal. The climb typically spans 18 days, with the highest point reached on summit day, when you stand atop Mera Peak. The trek starts from Lukla at around 2,800 meters. Along the way, you will pass through villages like Namche Bazaar (3,440 m) and Dingboche (4,360 m), gradually ascending to higher altitudes to prepare for the climb.
The highest point on the climb is the summit of Mera Peak (6,376 m), which requires reaching the High Camp at about 5,800 meters before making the final ascent. Climbers typically reach altitudes of around 5,600 meters on their daily trek, with High Camp being the highest overnight point before the summit push. In contrast, Mera Peak doesn’t require advanced mountaineering skills; the technical nature of the climb and the thin air demand physical fitness, acclimatization, and proper gear for a successful summit.
Mera Peak Height
- Mera Base Camp altitude 5,300m/17,384ft
- Mera La altitude 5,415m/17,765ft
- Mera High Camp altitude 5,800m/19,029ft
- Mera Peak altitude 6,476m/21,247ft
On the third day, you reach Chutanga at 3,050m, and beyond this point, the effects of altitude become more noticeable. Most trekkers begin to feel the impact of altitude sickness from Thagnak at 4,350m. We move deliberately to cope with the increasing altitude, ensuring proper acclimatization. Our Mera Peak climb itinerary includes two rest days, crucial for allowing our bodies to adapt to the decreasing oxygen levels. Staying fully hydrated and avoiding dehydrating drinks is essential as you gain elevation.
If you develop altitude sickness during the Mera Peak expedition, our expert Sherpa guides are equipped with extra medications. In more severe cases, we can provide oxygen cylinders and facilitate a descent to a lower altitude. You can arrange a helicopter evacuation for extreme symptoms according to your travel insurance. Consider the Everest Three Pass Trek for those seeking an even more challenging experience.
Check the Everest Three Pass Trek for a more challenging experience.
Mera Peak Climbing Route
Our Mera Peak climbing journey typically spans 18 days, combining treks through scenic valleys with acclimatization stops and nights spent in tea houses or tented camps. After flying to Lukla, we will begin our trek, following a route similar to the Everest Short Trek, which passes through Namche Bazaar. We will trek for about six days, taking a rest day in Thangnak for acclimatization before reaching Khare, a critical acclimatization point and training base for the final ascent.
From Khare, we will continue our journey towards Mera Base Camp, also known as Mera La, where we will spend the first night. The next day, we will proceed to High Camp, where we will rest before our final summit push. Summit day will be the most challenging, as we will need to begin our ascent early in the morning. We will battle cold, snow, and icy conditions, but the reward is a spectacular 360-degree view of the Himalayas.
After reaching the summit, we will return to Khare to rest before beginning our descent. The return journey will take us back to Lukla, following the same route we trekked in, but with more relaxed pacing as we descend. We will spend nights in tea houses and camps, reflecting on our achievements and taking in the stunning views once again. Arriving back in Lukla, we will fly back to Kathmandu, completing the circle of an unforgettable Himalayan adventure.
Would you be able to get there?
To travel to Nepal from the USA, UK, Spain, Norway, Australia, or other European countries, simply take an international flight to Tribhuvan International Airport in Kathmandu. Many flights connect through the Middle East, with Qatar Airways, Gulf Air, and Emirates offering daily options. Among these, Qatar Airways usually has the shortest layovers in Doha. Another option is to fly via Delhi with airlines like British Airways or Air India, then take a connecting flight to Kathmandu. Please check flight schedules carefully, as some routes have long layovers.
Once you arrive in Nepal, you can use domestic flights, private vehicles, or tourist buses to get around. If you are trekking in the Everest region, flights to Lukla are the quickest and most convenient option. Still, during peak seasons, you may need to travel to Ramechhap first, which involves a 5 to 6-hour drive from Kathmandu. For other regions, such as Annapurna or Langtang, tourist buses and private jeeps are popular choices. However, road conditions can be challenging, with winding and narrow highways that may slow you down. Flights to cities like Pokhara are a faster and more comfortable alternative when available.
Avoid booking transportation at the last minute to ensure a smooth trip, especially during the busy trekking season. Reconfirm your domestic flights to places like Lukla, as weather delays are common. Avoid traveling with poorly reviewed bus companies or airlines, as their safety and service standards can vary significantly. It is also a good idea to have travel insurance, keep digital and physical copies of your documents, and avoid carrying large amounts of cash. Planning and staying cautious will make your Nepal adventure stress-free and memorable.
Flight To Lukla
Flying to Lukla is the most common way to start your trek to the Everest region. The flight departs from Kathmandu’s Tribhuvan International Airport and takes about 40 minutes to reach Lukla. Lukla Airport, officially known as Tenzing-Hillary Airport, is known for having one of the most dangerous runways in the world due to its short length and steep incline. The runway is only 527 meters long and situated at an elevation of 2,860 meters, surrounded by the Himalayan mountains. The unique runway design makes it a challenging and thrilling adventure for all trekkers.
The Lukla flights can be delayed or canceled for various reasons, especially during the peak trekking seasons (spring and autumn). Bad weather, including heavy rainfall, clouds, or high winds, is a common cause of delays. The airport operates with a single runway; only smaller aircraft, such as the Twin Otter or DHC-6, can land there. A one-way flight from Kathmandu to Lukla typically costs $225. Taking this flight, you will get spectacular views of the surrounding mountains, including glimpses of Everest on a clear day.
Luggage limit
The luggage limit for flights to Lukla is typically 15 kg: 10 kg for checked baggage and 5 kg for hand luggage. If you have more than this, you may need to pay extra fees for the additional weight. As the aircraft flying to Lukla are generally small and have limited space, it is essential to pack light. I would also suggest you check with your airline for any specific regulations or updates on baggage policies.
Accommodation During Mera Peak Climbing
During your Mera Peak trek, the accommodation options will vary depending on your location along the trail. In the lower areas, especially during the approach to Mera Peak, you will stay in basic teahouses and lodges that offer simple rooms, usually shared bathrooms. These accommodations often provide electricity but may be limited to specific hours, typically in the evenings. Some teahouses may offer battery recharge facilities, where you can charge your devices for a small fee. Hot shower facilities are available in some lodges, but may incur an additional charge, and the water temperature may not always be consistently hot due to altitude and weather conditions.
As you get higher on the trek, especially around Mera Peak base camp, accommodation options become more basic. In these higher altitudes, you may need to stay in makeshift tents or camps due to the lack of teahouses or lodges. The facilities will be limited, with fewer opportunities for electricity or hot showers. Rooms are generally simple sleeping arrangements; you must rely on the services of your expedition team. As a result, it is essential to pack appropriately for these conditions. We recommend carrying a sleeping bag and personal gear to ensure you’re comfortable in the colder, more remote areas.
Food & Water Along Mera Peak Climb
During the Mera Peak Summit journey, you’ll get fresh, cooked, and hygienic meals prepared in local teahouses and camps. The food is simple, high in energy, and helps you stay strong in the cold Himalayan conditions. Here’s what you can expect throughout your trek.
- Breakfast Items: Porridge (oats, cornflakes, or rice), pancakes with honey or jam, boiled eggs or omelette, Tibetan bread or chapati, toast with butter or peanut butter, tea, or coffee
- Lunch Items: Dal Bhat (rice, lentil soup, and vegetable curry), fried rice or noodles with vegetables or eggs, potato curry or boiled potatoes, vegetable soup or noodle soup, seasonal greens with local pickles, tea or lemon ginger drink
- Dinner Items: Dhal Bhat set (rice, lentil soup, vegetables, and sometimes chicken), thukpa (Tibetan noodle soup), pasta or macaroni with tomato sauce, sherpa stew (a mix of rice, meat, and vegetables), garlic soup, hot tea or herbal drinks
Communication & Internet Around Mera Peak Trek
Communication can be limited during the Mera Peak Climb, especially as you go higher into the mountains. In lower altitudes, you can find mobile network coverage in places like Lukla, Namche Bazaar, and other popular spots. You can buy internet access from a local SIM card in Kathmandu or at specific points on the trek. It will allow you to use mobile data in areas with coverage. However, remember that the signal will weaken as you ascend. It is always a good idea to let your friends or family know that you might not always be reachable during the trek.
Some teahouses offer satellite phone services for emergencies, but these services typically come at an additional cost. While internet access is available in select teahouses, it can be slow, and Wi-Fi is normally offered for an additional fee, which varies from location to location. If staying connected is essential, consider bringing extra power banks to charge your devices, as electricity may not be readily available or reliable in higher-altitude areas. Carrying a local SIM card and understanding the limited connectivity will help you stay prepared for the trek.
Best Season for Mera Peak Expedition
The best season to climb Mera Peak depends on weather, visibility, and trail conditions. Since the Mera Peak altitude is 6,476 m, temperatures and safety vary by season. Here’s what you can expect throughout the year.
- Spring (March-May): Stable weather, dry trails, and blooming forests make it the best season for climbing
- Summer / Monsoon (June-August): Heavy rain, fog, and slippery trails make this the least suitable time for Mera Peak climbing
- Autumn (September-November): Clear skies, dry paths, and mild temperatures provide perfect conditions for summit attempts.
- Winter (December-February): Cold temperatures and snowfall create tough but peaceful climbing conditions for experienced trekkers.
Mera Peak Climbing Temperature
The temperature during Mera Peak Climbing changes with altitude and season, as the journey ranges from Lukla to the top of the peak. At lower altitudes, such as Lukla to Kothe, daytime temperatures remain mild, between 10°C and 20°C. However, as you move higher to Thangnak and Khare, the temperature begins to drop sharply. During the night it can reach up to -5°C to -10°C. Near the Mera High Camp and the summit, the cold temperatures often fall between -15°C and -25°C, depending on the season and wind conditions.
During spring, the temperature is moderate, and days are warm enough for trekking while nights remain bearable with proper gear. In the autumn, the temperature can be colder above 5,000 m, and in winter, the temperature can drop below -25°C at the base camps. In contrast, summer offers warmer temperatures at lower altitudes but frequent rain and landslides.
Despite these changes, Mera Peak remains achievable with good preparation and suitable clothing. You’ll need layered clothing to adapt to rising and falling temperatures as you ascend. Knowing the temperature variations helps you plan better, stay safe, and fully enjoy the journey.
Permits for Mera Peak Climbing
To climb Mera Peak, you’ll need three main permits: NMA Mera Peak Climbing Permit, Local Area Permit, and Makalu Barun National Park Entry Permit. Here’s a complete breakdown in a table:
| Permit / Season | Nepali Nationals | SAARC Nationals | Other Foreign Nationals |
|---|---|---|---|
| NMA Mera Peak Climbing Permit: Spring (March-May) | NPR 4,000 (USD 30.3) | NPR 4,000 (USD 30.3) | USD 250 |
| NMA Mera Peak Climbing Permit: Autumn (September-November) | NPR 2,000 (USD 15.15) | NPR 2,000 (USD 15.15) | USD 125 |
| NMA Mera Peak Climbing Permit: Winter and Summer (December-February, June-August) | NPR 1,000 (USD 7.58) | NPR 1,000 (USD 7.58) | USD 70 |
| Khumbu Pasang Lhamu Rural Municipality Permit | NPR 3,000 (USD 21.4) | – | – |
| Makalu Barun National Park Entry Permit | Free (for locals) | NPR 1,500 (USD 11.36) | NPR 3,000 (USD 22.73) |
The Alpine grading system of Mera Peak
The Alpine grading system classifies Mera Peak as PD (Peu Difficile, or “slightly difficult”), indicating that the climb is moderately challenging but not technically demanding. It involves long trekking days, steep ascents, and icy terrain that require good fitness and basic mountaineering skills. Equipment like crampons, ropes, and an ice axe is necessary, especially near the summit. However, no advanced technical climbing is involved, making it suitable for beginners with proper preparation.
The high altitude and low technical grade make the PD grade reflect the need to take on the challenge. Acclimatization and physical endurance are crucial factors in ensuring safety and success. Guides will be essential in getting you through icy paths and crevasses safely. With the proper training and support, you can manage Mera Peak’s challenges and enjoy an incredible adventure in the Himalayas.
Can A Beginner Climb Mera Peak?
A beginner can climb Mera Peak, but it requires proper preparation, physical training, and mental determination. While it does not demand advanced technical climbing skills, the high altitude, long trekking days, and cold weather require effort and determination. Beginners should be prepared for steep ascents, glacier crossings, and the basic use of mountaineering equipment, such as crampons and ice axes.
Appropriate acclimatization is the only way to minimize the risks of altitude sickness. Mera Peak climbs are typically planned with gradual altitude gain and rest days to help trekkers adapt to the thin air. Physical fitness is equally important, and beginners should start training months in advance, focusing on cardio, strength building, and long hikes to prepare for the demanding trek. The best time for beginners to attempt the climb is during spring (March to May) or autumn (September to November), as these seasons offer stable weather and clear trails.
While Mera Peak is accessible for beginners, it has challenges. Mental determination and physical preparation are key to overcoming the tough sections, especially on summit day. Beginners should also be ready for the cold and unpredictable weather at high altitudes. Joining a group or climbing with a guide is highly recommended for support and safety. Though tough, the adventure is enriching when it comes to the views from the top of Mera Peak. Mera Peak offers an exciting adventure at 6,476 meters with breathtaking Himalaya views.
Mera Peak Expedition Difficulties
Climbing Mera Peak is achievable but comes with challenges that every trekker should be aware of. Here are the key difficulties:
- Flight Delays: Unstable weather can cause flight cancellations in and out of Lukla, which can disrupt the itinerary
- High Altitude: The summit is 6,476 m, which can cause altitude sickness if proper acclimatization is not followed.
- Glacier Travel: Sections near the summit involve crossing glaciers with crevasses, which requires the use of crampons and ice axes.
- Weather Conditions: Temperatures can drop to -25°C at night during High Camp, and sudden storms may occur above 5,000 m.
- Physical Fitness Required: You’ll need good cardiovascular endurance and leg strength for daily treks of 4-7 hrs at high altitudes.
- Navigation Challenges: Trails can be covered by snow or ice, which can make route finding difficult for those without experience.
- Limited Facilities: High Camps and Base Camp have minimal facilities; you’ll rely on tented accommodations and basic meals.
Mera Peak Emergency and Evacuation
Emergencies on the Mera Peak trek are essential for your safety, as climbing here includes high altitude, rugged terrain, and more physical stress. Altitude sickness, accidents, or other bad weather conditions can always happen without warning. Knowing how to handle emergencies, such as having the right medical supplies and keeping emergency contact numbers, can make all the difference. It is also essential to have travel insurance covering evacuation costs in case serious issues arise, as it will reduce the cost of emergency rescues at higher altitudes.
To protect yourself during emergencies, please follow your experienced guide, which is trained to handle such situations. Ensure you acclimate properly to avoid altitude sickness, listen to your body, and report any symptoms immediately. Carrying a satellite phone or a communication device and having emergency evacuation options in place, such as helicopter rescue, can be life-saving in critical situations. Carrying all necessary equipment, including a first-aid kit, medication, and enough water, will avoid any health problems that could lead to an emergency.
Travel Insurance for Mera Peak Climbing
Travel insurance is essential for climbing Mera Peak due to the risks associated with high-altitude trekking and mountaineering. A comprehensive policy should cover emergency medical evacuation, including helicopter rescue, which can be costly in remote mountainous regions. When purchasing travel insurance for Mera Peak climbing, ensure that the policy covers trekking and climbing activities up to the summit height of Mera Peak (6,476 meters).
Some insurance companies may have altitude limits for coverage, so it is essential to carefully review the policy details. Additionally, the policy should cover emergency evacuation, medical treatment in Nepal, and repatriation to your home country if necessary. Purchasing travel insurance from a reputable provider with experience in covering high-altitude trekking and mountaineering activities is recommended. Read the policy terms and conditions carefully to understand what is covered and any exclusions that may apply. Having adequate travel insurance provides peace of mind and financial protection in case of unexpected events during your Mera Peak climbing expedition.
Guide For Mera Peak Expedition
A guide for Mera Peak climbing in Nepal is essential for a safe and successful ascent to the summit. Sherpa climbing guides are experienced with the terrain, weather conditions, and potential hazards, especially when tackling popular trekking peaks like Mera Peak. They will take you to the summit through acclimatization and guide you along the south face of Mera, which is quite a challenging route. Their expertise helps you only focus on your climb without worrying about logistics. So, I’d like to let you focus on the best climbing experience.
A Sherpa climbing guide will also help you navigate the unique challenges of peak climbing. The Mera Peak trip requires proper acclimatization, and your guide will ensure a gradual ascent to help you avoid altitude sickness. With their assistance, you will have the confidence to push towards the summit of Mera Peak, knowing you have the support of a seasoned professional who has climbed Mera Peak in Nepal numerous times. Guidance from a Sherpa climbing expert is crucial for reaching the Mera summit safely and enjoying the breathtaking view from the top.
Climbing Mera Peak with a guide makes the trekking experience more organized and, at the same time, adds background stories about local life and valuable climbing tips to your adventure. Whether you’re seeking to climb Mera for the first time or aiming to conquer the summit again, a guide helps with every aspect of the journey. They will also link you with the culture and history of the area so that by the end of it, you will find your Mera Peak climbing journey more meaningful. Peak climbing is an excellent experience, made even better with their assistance, ensuring you reach the Mera summit with confidence and knowledge.
Tipping Culture For Guides & Porters
Although not mandatory, tipping your guides and porters is common in Nepal. It is a way to show appreciation for their hard work and dedication. These people play a significant role in ensuring your safety and comfort during the trek. Their support and efforts are vital to your success. A tip is a simple way to show appreciation for their service, as their salaries may not always be sufficient to cover their living expenses.
The tip amount depends on your satisfaction with their service, but it is essential to consider the standard practice. For guides, you can expect to tip around NPR 1,000 to 1,500 per day; for porters, NPR 500 to 1,000 per day is typical. It is often given at the end of the trek as a group to ensure fair distribution among the team. Of course, you can provide more if you feel their efforts have gone above and beyond.
Things to Consider For Climbing Mera Peak
Proper Research
No matter which part of the world you are exploring, you need to do the proper research. This helps you become familiar with the area and provides an appropriate understanding of what it offers. The same goes for Mera Peak Climbing. Trekking is not an easy task and requires adequate research. For this adventure, you should research everything from getting a visa to booking a trekking package.
Understanding the visa requirements, permits, and trekking routes is also essential. You should check the trekking package options and what each includes, such as guide services, meals, and accommodations. Information about local culture, traditions, and weather conditions can help you travel responsibly and with greater awareness. The more you know about the terrain, weather, and people, the smoother your experience will be.
Have your Customizable Itinerary
When booking with us, we offer you customization features. But you may be wondering why customization. A flexible itinerary helps you deliver a more personalized trekking experience in the Himalayas. You can tailor the itinerary to include additional acclimatization days and optional side trips to explore unique landmarks. A standard itinerary might not suit everyone, so adjust it to match your pace, fitness level, and interests.
For example, if you enjoy photography, you could add extra time at scenic spots like Khare or Zatrwa La Pass. If you are unsure about your fitness for longer trekking hours, include shorter days with more rest. Discuss your physical fitness level and acclimatization needs with your guide before the climb to ensure you are adequately prepared. A well-planned, customizable itinerary will allow you to maintain a comfortable pace and reduce the risks of altitude sickness or overexertion.
Acclimatize Properly
Proper acclimatization is crucial for avoiding altitude sickness and ensuring a successful climb. Your itinerary should include at least two to three acclimatization days, especially at elevations above 3,500 meters. The remaining days can be perfect for exploring nearby areas and letting your body adjust to the thin air.
Similarly, hydration plays a crucial role in acclimatization, and we recommend drinking 3 to 4 liters of water daily. Avoiding alcohol and caffeinated drinks before and during the journey is also essential. Maintain a slow and steady trekking pace to prevent overexertion. Listen to your body and inform your guide immediately if you experience symptoms like headaches, nausea, or shortness of breath. Proper acclimatization ensures you stay healthy and strong for the climb.
Choose Professional Guides & Climbers
An experienced guide is crucial for your safety and success on Mera Peak. They can make a huge difference in your overall adventure. Such guides help with navigation while providing information about the places you visit. They will also assist you in obtaining permits and resolving other logistical challenges. A professional guide receives training in dealing with issues that may arise from altitude sickness or injuries.
Please look for guides with proven experience in climbing Mera Peak. You should research and choose a guide certified by reputable organizations such as the Nepal Mountaineering Association. A good guide will lead you through the trek, motivating and supporting you during challenging moments. Their local knowledge and expertise will enhance your journey, making it safer and more rewarding.
Choose the Best Time
Timing is crucial for climbing Mera Peak. The best months are usually spring (March to May) and autumn (September to November). During these seasons, the weather is stable, and the views of the mountains are clear. Trails are less slippery, and you can enjoy the blooming rhododendrons in spring or the crisp autumn air.
Avoid trekking during the monsoon (June to August), as heavy rains make the trails muddy and dangerous. Winter (December to February) brings extreme cold and heavy snowfall, making climbing challenging. The right time ensures a safer, more comfortable, and enjoyable trekking experience.
Get Physically & Mentally Prepared
Climbing Mera Peak demands physical endurance and mental resilience. To prepare your body, start training at least three months in advance. You can incorporate cardio exercises, such as running, cycling, and swimming, to enhance your stamina. Exercises that strengthen your legs and core are also essential. You can do squats, lunges, and planks to prepare for uphill climbs and carrying a loaded backpack.
Mental preparation is equally important. You can read about the challenges of high-altitude trekking and visualize yourself overcoming them. Including mindfulness or meditation during your training will help you build focus and manage stress during difficult times. Training your body and mind ensures you can face the trek with confidence and determination.
Do not lack for your health & Hygiene.
Maintaining your health and hygiene during the trek is very important. Poor hygiene can lead to illnesses that might ruin your adventure. Always carry hand sanitizer, wet wipes, and a personal first aid kit. Be sure to pack the medications you need.
Drink only boiled or purified water and eat freshly prepared food to avoid stomach problems. Dress warmly to prevent colds or frostbite, and stay dry to avoid infections. Take regular breaks, get enough sleep, and monitor your body for signs of altitude sickness or fatigue. Staying healthy will enable you to enjoy the experience fully.
Currency Exchange
Managing money wisely is essential for a smooth trekking experience. Before leaving Kathmandu, it is advisable to exchange enough cash in Nepali currency (NPR), as ATMs and money exchange services are scarce or unavailable in remote trekking regions. Cash on hand is essential for paying permits, tips, and other expenses, as ATM access may be limited in remote areas.
Keep smaller denominations for minor expenses, such as snacks, souvenirs, or local services. For areas closer to Kathmandu or Lukla, using cash and digital payment options is also a good idea. Having the right amount of money with you can help avoid issues and ensure a smooth and stress-free experience.
Training for Mera Peak Climbing
Training for Mera Peak is essential, even though it’s considered a trekking peak. Practicing beforehand helps your body adjust to long hours of trekking, carries your gear more easily, and reduces the risk of altitude sickness. Physical fitness, cardiovascular health, and strength training all play key roles in maintaining a safe and successful summit attempt. Here are some recommended training routines:
- Cardiovascular Exercise: Running, cycling, or swimming for at least 30-60 minutes, 4-5 times a week, to improve endurance
- Strength Training: Focus on legs, core, and back using squats, lunges, step-ups, and planks
- Backpack Training: Train with a weighted backpack to simulate real trekking conditions. Start with 5-7 kg and increase to 10-15 kg on your trekking hikes
- Flexibility and Balance: Do Yoga or stretching exercises to improve agility and reduce injury risk
- Technical Skills: Learn to use crampons and an ice axe, practice rope and harness use, and understand self-arrest techniques. We also offer training at Khare, or you can take a short course beforehand
- Mental Preparation: Prepare by visualizing success, maintaining a positive mindset, researching the climb, and setting small goals.
Solo Vs Group: Which to Opt for Mera Peak Climbing?
Climbing Mera Peak solo (Private) offers unmatched flexibility, as you can set your pace and itinerary based on personal preferences. However, it comes with challenges, such as increased responsibility for navigation, safety, and carrying your gear, unless you have a guide and porter to support you. Solo climbers must be well-prepared and experienced in high-altitude trekking and climbing to handle emergencies and unpredictable weather conditions.
Climbing with a group provides enhanced safety. You will have access to shared resources, such as guides and porters, as well as the camaraderie of experiencing the journey with others. Groups, whether small (4-6 members) or large (10 or more members), benefit from collective decision-making and mutual encouragement. Smaller groups are more flexible and efficient in managing acclimatization and movement, while larger groups may offer more logistical support but face delays and less adaptability.
Whether you climb solo or in a group depends on your preference, experience, and confidence level. Solo climbing is perfect if you want freedom and a unique challenge. Similarly, group climbing is ideal for those who value teamwork and safety. Both options can lead to an incredible adventure if you are well-prepared, physically fit, and know what to expect on the climb.
Mera Peak vs Island Peak: Which to Choose?
When deciding between Mera Peak (6,476 m) and Island Peak (6,189 m), consider your fitness level, trekking experience, and the adventure you seek. Mera Peak is slightly higher, but its ascent is technically more straightforward, making it ideal if you focus more on endurance than technical climbing skills. The trek typically requires around 18 to 20 days, including acclimatization. It involves trekking through remote valleys, offering spectacular views of Everest, Makalu, and Kanchenjunga.
On the other hand, Island Peak requires approximately 16 to 18 days and is more technical, involving steep ascents that require the use of ropes and ladders. It is an excellent choice if you are eager to test your climbing skills and enjoy the iconic views of Lhotse and Ama Dablam. Both peaks demand excellent fitness, but Island Peak suits those seeking a steeper challenge. Your choice also depends on the experience you want during the trek.
Mera Peak leads you through quieter, less crowded trails, allowing you to connect with local Sherpa culture and the pristine wilderness. In contrast, Island Peak is near the Everest Base Camp route, so you will meet more trekkers, mainly if you include EBC in your itinerary. Mera Peak offers an incredible sense of solitude, while Island Peak provides the thrill of technical climbing in a bustling, iconic area. If this is your first high-altitude climb, Mera Peak’s more straightforward ascent may be better, but if you’re seeking a climbing challenge, Island Peak will push your limits.
Why Choose My Everest Trip (MET) for Mera Peak Climbing?
- We have cost-efficient packages ranging from USD 1,995 covering permits, guides, accommodation, and meals.
- We offer expert Mera Peak Climbing guides for safety, proper route navigation, and high summit success rates.
- MET offers well-planned itineraries including acclimatization days, contingency days, and flexible schedules for changing weather.
- Our team provides experienced support staff for logistics, equipment transport, assistance at high camps, and base camp.
- We have local knowledge about the less crowded trails around Hinku Valley and viewpoints.
- We offer high-quality accommodation in teahouses and base camps with hygienic food and clean facilities.
- Our team provides complete pre-trek guidance and training tips to help you prepare physically and mentally.
- We have 24/7 emergency support and communication systems to handle altitude sickness or unexpected issues.
Packing List For Mera Peak Climbing
Are you planning to attend the Mera Peak Summit? You should make proper preparations, including an appropriate packing list. We recommend you not carry more than 8 to 18 kg of stuff. Packing only essentials and avoiding overpacking will help make your journey much smoother and give you peace of mind. But you may be wondering what essentials to pack with you. Here is a proper checklist of packing items for your journey.
Clothing
- Base layers (thermal tops and bottoms)
- Mid layers (fleece jacket, insulated jacket)
- Outer layers (waterproof jacket and pants)
- Down jacket (heavy-duty)
- Trekking pants (lightweight)
- Underwear (moisture-wicking)
- Gloves (inner gloves, insulated climbing gloves, mittens)
- Hats (warm hat, sun hat, balaclava/neck gaiter)
Footwear
- Mountaineering boots (insulated and crampon-compatible)
- Trekking boots (waterproof)
- Camp shoes
- Socks (thermal and liner)
- Gaiters
Gear & Equipment
- Ice axe
- Crampons
- Climbing harness
- Carabiners (locking and non-locking)
- Helmet
- Ropes (if not provided)
- Trekking poles
- Headlamp (with extra batteries)
- Sunglasses (UV protection)
- Backpack (daypack and trekking pack)
- Sleeping bag (rated for -20°C)
Personal Items
- Water bottles (insulated)
- Hydration system (optional)
- Snacks (energy bars, chocolates, trail mix)
- Toiletries (toothbrush, toothpaste, biodegradable soap, wet wipes, sunscreen)
- First aid kit (personal medications, Diamox, blister care)
- Documents (permits, passport, travel insurance, cash)
Electronics
- Power bank
- Camera (optional)
- GPS watch
- Adapters and chargers
Miscellaneous
- Duffel bag
- Rain cover (for backpack)
- Towel (quick-drying)
- Maps (paper or digital)
- Books or journals
- Others: Energy supplements, trekking snacks, or additional warm layers for extreme cold.
Mera Peak Climbing FAQs
Where exactly is Mera Peak Located?
Mera Peak is located in the Mahalangur Himalayan range in the Solukhumbu district of eastern Nepal. It is situated in the east of the main Everest Base Camp trail and south of Mount Everest. It lies within the remote Hinku Valley and is part of the Makalu Barun National Park.
What is the success rate for climbing Mera Peak?
The success rate for climbing Mera Peak is between 70% and 95%. Factors like acclimatization, physical fitness, weather conditions, experiences, and choosing the right season influence your success rate. Hence, proper planning and preparation are important to achieve a high success rate on Mera Peak.
Why should I climb Mera Peak instead of Island?
You should choose Mera Peak instead of Island if you want a higher, less technical, and more remote climbing experience with panoramic views of five 8,000 m peaks: Mount Everest, Lhotse, Makalu, Cho Oyu, and Kangchenjunga.
How can I book the Mera Peak Climbing?
You can book the Mera Peak Climbing by contacting My Everest Trip directly through our website, WhatsApp (+9779851069558), or email ([email protected]). Once you choose your preferred itinerary and confirm the details, you’ll need to pay a booking deposit to secure your spot.
Are drone cameras allowed on the trek?
Yes, drone cameras are allowed on the Mera Peak trek, but you must obtain special permits from the Civil Aviation Authority of Nepal (CAAN) and, in some areas, additional approval from local municipalities of the national park is required, because flying drones without permission may result in fines or confiscation.
Do I need vaccinations for Mera Peak?
No vaccines are officially mandatory for Mera Peak, but it is recommended to be up to date on common travel vaccines such as Hepatitis A, Typhoid, Tetanus, Diphtheria, Pertussis (Tdap), Polio, COVID-19, and Measles-Mumps-Rubella (MMR).
What should I do if I get injured on the trek?
If you get injured, your guide is your most important resource. They are trained in high-altitude first aid and emergency procedures, are equipped with satellite communication, and will monitor your condition. Describe exactly what happened and how you feel, including the location and intensity of the pain.
How many acclimatization days are included in the Mera Peak package?
There are two acclimatization days in our package: one on day 7 at Thangnak and another after the trek in Kathmandu. The second day can be canceled if there are contingencies during the summit attempt or the flight due to the weather.
Who are the Sherpa people?
Sherpa people are a Tibetan ethnic group native to the mountainous region of Nepal. Particularly the Solukhumbu district, which is home to Mount Everest. The term “Sherpa” literally means “eastern people” (from the Tibetan words shar for “east” and pa for “people”).
Is it necessary to bring toilet paper for the Mera Peak trek?
Yes, it is necessary to bring your own toilet paper for the trek. While you will be staying in teahouses for much of the trek, they rarely support toilet paper. You can buy toilet paper in the guesthouses during the trek, but it can be expensive, so we suggest you bring some with you.
I am a vegetarian will that be okay?
Being a vegetarian is not the problem for the trek. In fact, it is often recommended to stick to vegetarian food at higher altitudes to avoid food safety issues with meat. Teahouses’ menus and camping food offer plenty of vegetarian options, and we’ll make sure your dietary needs are met.
Does your agency have a PAC (Portable Altitude Chamber)?
Yes, our agency has a PAC in case of any emergency. It is not essential to carry it during the trek, but we can arrange it upon request for an extra cost.
What kind of trekking boot would be best for the trek?
You’ll need two types of footwear: a comfortable, durable trekking boot for the lower altitude and an insulated high-altitude mountaineering boot for the summit push. For a lower altitude, you can use products like Lowa Renegade GTX Mid, La Sportiva TXS GTX, Merrell Moab Mid 2 Waterproof, and for higher altitude, you can use La Sportiva G2 EVO / G2 SM, La Sportiva Baruntse, Scarpa Phantom 6000, and Kailas GTX.
What is required to protect myself from the sun during the trek?
You need strong sun protection because the UV radiation increases with altitude during the Mera Peak trek. Wear UV-protection sunglasses, a wide-brimmed hat, and long-sleeve clothing. Apply SPF 50+ sunscreen and lip balm regularly to avoid burns and dryness. Use a buff or neck gaiter for extra coverage and stay hydrated throughout the trek.
US$ 2,195 per person
- Best Price Guarantee
- Secured Payment System
- Tailored and Personalized Itinerary
- 70% repeat customers
24 X 7 Live Support

Puru (+977-9851069558)
Related Trips
Moderate 🞄
 5.0 (175)
16 Days Everest Base Camp Trek with Island Peak Climbing
16 Days in Nepal
Recent From Our Blog Places of attractions, travel tips, news and more.
Climbing, Peak climbing
Exploring the Peaks of Nepal – A Guide to Climbing in Nepal
Regarding extreme activities, peak climbing in Nepal is right up there. There are several reasons…
Read the full post